So I finally got around to try mounting the motor on the weekend and it was a little trickier than I thought.
My plan was to screw the mounting bracket into the truck with some metal screws.
The cogs
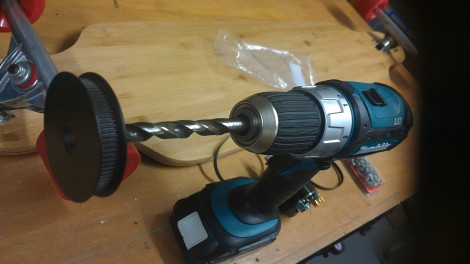
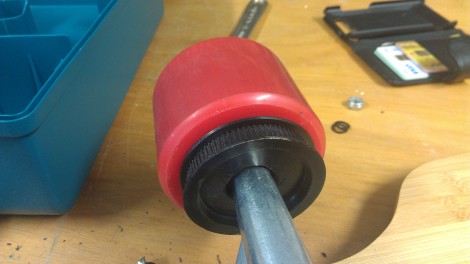
I needed to start by attaching the large cog the the wheel. The hole in the middle of the cog wasn’t large enough so I had to drill a larger whole through the middle. This took me longer than expected as I hole needed to be quite large and I didn’t really have a large enough drill bit to to this so it all got very messy very quickly.
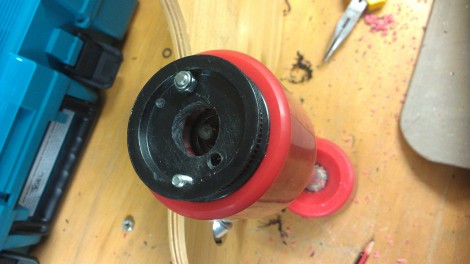
I now needed some really long screws that went all the way through the cog and into the wheel while being very very sure that the cog was centred on the wheel as to not wobble while the wheel spins. My local hardware didn’t have long enough screws but did have some long thin threaded rod that I could cut up into appropriate lengths. As you can see from the results I didn’t do a very neat job. The walls of the wheel are on an angle so when drilling into them the drill bit slide which made the bolts come through on an angle. Not neat or pretty but should work fine. I got nylon threaded bolts which should hold with the vibration.
So big cog done. Now to figure out where the motor goes. So I put the belt around the large cog and linned up the metal bracket and drew an arc on the side of the metal to where the belt reached to and this what where I needed to drill the whole for the motor. I’ve drilled a couple of elnogated whole so once the belt and cog is on I can position it exactly with enough tension on the belt.
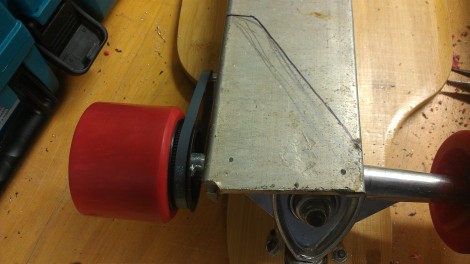
I also used a jigsaw to cut the right angled piece of aluminium into the shape below.

The bracket
I started with drilling some guide whole through the plate and into the trucks. This went fine until I reached the solid hardened steel axel that runs through the middle of the truck. Turns out the cheap drill bit that says it works on wood and steel doesn’t really work so great. Long storey short I snap a drill bit and was forced to go get a new one. However with a nice new drill bit I was able to drill into the axel what I thought was sufficiently.
So now that I had the guide holes through the metal a took my metal screws and attempted to get them in. This is were it got even messier. It was all going okay until nearing the end it stopped drilling in and instead twisted the head off the screws.
The guide wholes must have been too small and once the screws got into the hardened steed axle in the middle of the trucks the screws gave out before they screwed deeply into the axle causing the heads to rip off. While the heads ripped off the screws seem to be quite secure. They seem to be holding the aluminium bracket in place quite well.
The is a significant gap between the bracket and the trucks as the screws never pulled tight before snapping off however it seems to be holding good enough at this point. Now I could try drilling larger guide holes and screwing them in however the simple fact is its going to be a bit hard pulling this apart to do that. And its quite securely together so I’m going to need the angel grinder to do that.
So while its not very neat it seems to do the job. The bracket is holding the motor in place and doesn’t want to move anywhere.
Small motor cog
The small motor cog the hobby store sent me was plastic and has no mechanism for attaching it to the motor, even though I explain exactly what I needed it for??? So I’ve called them up and they’re sending me out a aluminium small cog which has screws that I can clamp it to the shaft of the motor. Unfortuatley its suited to a 6mm motor sharft and my motor is a 8mm so it will require some drilling out.
The electrics
Still waiting for these to be delivered from the US so I’m hoping they arrive this week so I can finish this project up soon and get riding .
What would I do differently?
Screw larger guide holes through the bracket and truck (and maybe try and find stronger screws)
Be more careful when screwing through the wheels especially with the movement of the drill bit on the slope of the side of the wheels. I needed a larger drill set as well.
Added costs to the project
Threaded rod $8.00
Bolts $3.00
New drill bit $5.64
New small cog: $25.00


Do you necessarily have to mount the motor to the metal. Can you just put the motors in a plastic box and mount it directly to the board?
Yes it needs to attach to the trucks. Trucks twist when you corner and hence the distance between the board and wheel changes. If you mounted the motor to the board the drive belt/chain would either snap or fall off loose.
Proper tools are necessary. This job requires a drill press. No question. Out of line holes, wobbly holes, breaking bits. A drill press is essential.
Your right, it looks like a dogs breakfast. A drill press would have made life much easier.
How did you center the cog on the wheel? 😮
I just held it in place then drilled it. Can’ t say it is 100% accurate but I was close enough. However you want to be as careful as possible with this.
where did you get the small cog for the motor?